<?xml version="1.0" encoding="utf-8"?><feed xmlns="http://www.w3.org/2005/Atom" ><generator uri="https://jekyllrb.com/" version="3.10.0">Jekyll</generator><link href="https://danloman.com/feed.xml" rel="self" type="application/atom+xml" /><link href="https://danloman.com/" rel="alternate" type="text/html" /><updated>2026-02-24T12:14:00+00:00</updated><id>https://danloman.com/feed.xml</id><title type="html">Dan Loman</title><subtitle>Developer. Creator. Open-source author. Passionate about inspirational and
 life-simplifying products which empower people to get things done quickly
 and get back to enjoying their lives.</subtitle><author><name>Dan Loman</name><email>me@danloman.com</email></author><entry><title type="html">Introducing jt. A JSON trimmer.</title><link href="https://danloman.com/2023/01/15/introducing-jt.html" rel="alternate" type="text/html" title="Introducing jt. A JSON trimmer." /><published>2023-01-15T00:00:00+00:00</published><updated>2023-01-15T00:00:00+00:00</updated><id>https://danloman.com/2023/01/15/introducing-jt</id><content type="html" xml:base="https://danloman.com/2023/01/15/introducing-jt.html"><![CDATA[<p>Today I’d like to <a href="https://github.com/namolnad/jt">introduce you to jt</a> — a small command-line tool that allows you to take a JSON blob as input and return a subset of that JSON blob based on a simple schema argument.</p>

<h2 id="neat-show-me">Neat. Show me.</h2>

<p>Ok. Here’s an example:</p>

<blockquote>
  <div class="language-js highlighter-rouge"><div class="highlight"><pre class="highlight"><code><span class="p">{</span><span class="dl">"</span><span class="s2">body</span><span class="dl">"</span><span class="p">:{</span><span class="dl">"</span><span class="s2">key1</span><span class="dl">"</span><span class="p">:[</span><span class="mi">1</span><span class="p">,</span><span class="mi">2</span><span class="p">,</span><span class="mi">3</span><span class="p">],</span><span class="dl">"</span><span class="s2">key2</span><span class="dl">"</span><span class="p">:{</span><span class="dl">"</span><span class="s2">key3</span><span class="dl">"</span><span class="p">:</span><span class="mi">3</span><span class="p">,</span><span class="dl">"</span><span class="s2">key5</span><span class="dl">"</span><span class="p">:</span><span class="dl">"</span><span class="s2">string</span><span class="dl">"</span><span class="p">},</span><span class="dl">"</span><span class="s2">key4</span><span class="dl">"</span><span class="p">:</span><span class="dl">"</span><span class="s2">value</span><span class="dl">"</span><span class="p">,</span><span class="dl">"</span><span class="s2">key5</span><span class="dl">"</span><span class="p">:[]}}</span>
</code></pre></div>  </div>
  <p>Given the above file, <code class="language-plaintext highlighter-rouge">example.json</code>, we can run this simple command:</p>
  <div class="language-bash highlighter-rouge"><div class="highlight"><pre class="highlight"><code><span class="nb">cat </span>example.json | jt <span class="s1">'{body{key1,key2{key3},key4}}'</span>
</code></pre></div>  </div>
  <p>This will produce the following trimmed output:</p>
  <div class="language-js highlighter-rouge"><div class="highlight"><pre class="highlight"><code><span class="p">{</span><span class="dl">"</span><span class="s2">body</span><span class="dl">"</span><span class="p">:{</span><span class="dl">"</span><span class="s2">key1</span><span class="dl">"</span><span class="p">:[</span><span class="mi">1</span><span class="p">,</span><span class="mi">2</span><span class="p">,</span><span class="mi">3</span><span class="p">],</span><span class="dl">"</span><span class="s2">key2</span><span class="dl">"</span><span class="p">:{</span><span class="dl">"</span><span class="s2">key3</span><span class="dl">"</span><span class="p">:</span><span class="mi">3</span><span class="p">},</span><span class="dl">"</span><span class="s2">key4</span><span class="dl">"</span><span class="p">:</span><span class="dl">"</span><span class="s2">value</span><span class="dl">"</span><span class="p">}}</span>
</code></pre></div>  </div>
</blockquote>

<p>As mentioned above, <code class="language-plaintext highlighter-rouge">jt</code> will take the JSON input and transform it based on the schema provided, outputting only the selected keys and values.</p>

<h2 id="ok-but-why-jt">Ok… But why jt?</h2>

<p>JSON responses from REST endpoints often become bloated over time, and in many cases, mobile clients only need a small portion of the response — a response which may have been originally intended for a desktop interface. <code class="language-plaintext highlighter-rouge">jt</code> was created to address this issue by allowing clients to select only the portion of a network response that they need. This has the benefit of reducing the amount of data sent over the wire.</p>

<p>While GraphQL is a powerful tool that can also accomplish this, this is not its end goal in and of itself, and choosing GraphQL comes with its own costs and tradeoffs. It requires a significant investment of time and resources to convert a project or company’s backend and clients to GraphQL, it has a steep learning curve, and queries from the client can quickly become difficult to optimize when numerous endpoints are stitched together (sometimes creating N+1 query issues that need to be addressed.)</p>

<p><code class="language-plaintext highlighter-rouge">jt</code> is designed to be a simpler, targeted tool for trimming JSON responses. The client can send a schema for a given request as a custom header, or this data can be persisted server-side and versioned alongside client updates. While similar json manipulation tools, such as jq, exist, <code class="language-plaintext highlighter-rouge">jt</code> is specifically designed for deep, nested filtering.</p>

<p>Please note that <code class="language-plaintext highlighter-rouge">jt</code> is a new tool and may overlook many complexities, corner cases, and perhaps even support of the full JSON spec. That said, I’d love for you to try <code class="language-plaintext highlighter-rouge">jt</code> and share your thoughts and suggestions for improvements. You can check it out at <a href="https://github.com/namolnad/jt">https://github.com/namolnad/jt</a>. Feel free to share feedback with me using any of the methods shown at the bottom of this page — looking forward to hearing from you!</p>]]></content><author><name>Dan Loman</name><email>me@danloman.com</email></author><summary type="html"><![CDATA[Today I’d like to introduce you to jt — a small command-line tool that allows you to take a JSON blob as input and return a subset of that JSON blob based on a simple schema argument.]]></summary></entry><entry><title type="html">Use a Gatekeeper to manage control flow</title><link href="https://danloman.com/2021/02/14/use-a-gatekeeper-to-manage-control-flow.html" rel="alternate" type="text/html" title="Use a Gatekeeper to manage control flow" /><published>2021-02-14T18:09:00+00:00</published><updated>2021-02-14T18:09:00+00:00</updated><id>https://danloman.com/2021/02/14/use-a-gatekeeper-to-manage-control-flow</id><content type="html" xml:base="https://danloman.com/2021/02/14/use-a-gatekeeper-to-manage-control-flow.html"><![CDATA[<p>A control-flow technique which many of you are likely familiar with goes something like this:</p>

<div class="language-swift highlighter-rouge"><div class="highlight"><pre class="highlight"><code><span class="kd">class</span> <span class="kt">MyViewController</span><span class="p">:</span> <span class="kt">UIViewController</span> <span class="p">{</span>
    <span class="kd">private</span> <span class="k">var</span> <span class="nv">isLoading</span><span class="p">:</span> <span class="kt">Bool</span> <span class="o">=</span> <span class="kc">false</span>

    <span class="kd">func</span> <span class="nf">load</span><span class="p">()</span> <span class="p">{</span>
        <span class="k">guard</span> <span class="o">!</span><span class="n">isLoading</span> <span class="k">else</span> <span class="p">{</span> <span class="k">return</span> <span class="p">}</span>

        <span class="n">isLoading</span> <span class="o">=</span> <span class="kc">true</span>

        <span class="n">model</span>
            <span class="o">.</span><span class="nf">fetch</span><span class="p">()</span>
            <span class="o">.</span><span class="nf">handleEvents</span><span class="p">(</span><span class="nv">receiveCompletion</span><span class="p">:</span> <span class="p">{</span> <span class="p">[</span><span class="k">weak</span> <span class="k">self</span><span class="p">]</span> <span class="n">_</span> <span class="k">in</span>
                <span class="k">self</span><span class="p">?</span><span class="o">.</span><span class="n">isLoading</span> <span class="o">=</span> <span class="kc">false</span>
            <span class="p">}</span>
        <span class="o">...</span>
    <span class="p">}</span>
<span class="p">}</span>
</code></pre></div></div>

<p>This methodology—one I’ve used many times—is plenty effective, but has always felt slightly cumbersome and potentially error prone as there are several areas where you need to toggle the <code class="language-plaintext highlighter-rouge">isLoading</code> boolean and—as such—there are several opportunities to forget to do so. I’ve long been considering a <code class="language-plaintext highlighter-rouge">propertyWrapper</code> to encapsulate and streamline this logic, but I struggled to come up with naming and ergonomics which felt like an improvement over the existing solution.</p>

<p>After a bit of brainstorming, I initially wanted to relate this concept to a mutex. However with the help of a colleague, I decided that overloading the mutex name wasn’t the right decision. Following some further ideation, I came upon the <code class="language-plaintext highlighter-rouge">Gatekeeper</code> concept. Essentially, we can imagine there is a human gatekeeper who only allows passage if you haven’t already entered, and with whom we must check if we are able to “pass”. After toying around with this a bit, I decided there wasn’t a need for a propertyWrapper and that a simple struct should suffice.</p>

<p>Here is a simple example of such a type in action:</p>

<div class="language-swift highlighter-rouge"><div class="highlight"><pre class="highlight"><code><span class="kd">class</span> <span class="kt">MyViewController</span><span class="p">:</span> <span class="kt">UIViewController</span> <span class="p">{</span>
    <span class="kd">private</span> <span class="k">var</span> <span class="nv">loadingGatekeeper</span> <span class="o">=</span> <span class="kt">Gatekeeper</span><span class="p">()</span>

    <span class="kd">func</span> <span class="nf">load</span><span class="p">()</span> <span class="p">{</span>
        <span class="k">guard</span> <span class="n">loadingGatekeeper</span><span class="o">.</span><span class="nf">attemptPassage</span><span class="p">()</span> <span class="k">else</span> <span class="p">{</span> <span class="k">return</span> <span class="p">}</span>

        <span class="n">model</span>
            <span class="o">.</span><span class="nf">fetch</span><span class="p">()</span>
            <span class="o">.</span><span class="nf">handleEvents</span><span class="p">(</span><span class="nv">receiveCompletion</span><span class="p">:</span> <span class="p">{</span> <span class="p">[</span><span class="k">weak</span> <span class="k">self</span><span class="p">]</span> <span class="n">_</span> <span class="k">in</span>
                <span class="k">self</span><span class="p">?</span><span class="o">.</span><span class="n">loadingGatekeeper</span><span class="o">.</span><span class="nf">reset</span><span class="p">()</span>
            <span class="p">})</span>
        <span class="o">...</span>
    <span class="p">}</span>
<span class="p">}</span>
</code></pre></div></div>

<p>We’ve now reduced the need for an extra toggling of the <code class="language-plaintext highlighter-rouge">isLoading</code> boolean as this has been handled by the <code class="language-plaintext highlighter-rouge">Gatekeeper</code> type during the <code class="language-plaintext highlighter-rouge">attemptPassage()</code> call. One less chance for errors. 🎉</p>

<p>Of course this is not without its tradeoffs. In this case there may be a slight bit of cognitive overhead understanding the <code class="language-plaintext highlighter-rouge">Gatekeeper</code> type as well as the intention behind this particular instance. However, I feel the type is simple enough where a developer should be able to quickly understand it in its entirety—and with proper naming of the <code class="language-plaintext highlighter-rouge">gatekeeper</code> property, the purpose of this instance should remain very straightforward.</p>

<p>As we dive into the declaration of the struct behind this, we can see it is incredibly simple, yet extensible enough to allow for managing various portions of “stateful” control flow.</p>

<div class="language-swift highlighter-rouge"><div class="highlight"><pre class="highlight"><code><span class="kd">public</span> <span class="kd">struct</span> <span class="kt">Gatekeeper</span><span class="o">&lt;</span><span class="kt">Value</span><span class="o">&gt;</span> <span class="p">{</span>
    <span class="kd">private</span> <span class="k">var</span> <span class="nv">value</span><span class="p">:</span> <span class="kt">Value</span>
<span class="p">}</span>

<span class="kd">extension</span> <span class="kt">Gatekeeper</span> <span class="k">where</span> <span class="kt">Value</span> <span class="o">==</span> <span class="kt">Bool</span> <span class="p">{</span>
    <span class="k">var</span> <span class="nv">mayPass</span><span class="p">:</span> <span class="kt">Bool</span> <span class="p">{</span> <span class="n">value</span> <span class="p">}</span>

    <span class="nf">init</span><span class="p">()</span> <span class="p">{</span>
        <span class="k">self</span><span class="o">.</span><span class="n">value</span> <span class="o">=</span> <span class="kc">true</span>
    <span class="p">}</span>

    <span class="kd">@discardableResult</span>
    <span class="kd">public</span> <span class="k">mutating</span> <span class="kd">func</span> <span class="nf">attemptPassage</span><span class="p">()</span> <span class="o">-&gt;</span> <span class="kt">Bool</span> <span class="p">{</span>
        <span class="k">defer</span> <span class="p">{</span> <span class="n">value</span> <span class="o">=</span> <span class="kc">false</span> <span class="p">}</span>
        <span class="k">return</span> <span class="n">value</span>
    <span class="p">}</span>

    <span class="kd">public</span> <span class="k">mutating</span> <span class="kd">func</span> <span class="nf">reset</span><span class="p">()</span> <span class="p">{</span>
        <span class="k">self</span><span class="o">.</span><span class="n">value</span> <span class="o">=</span> <span class="kc">true</span>
    <span class="p">}</span>
<span class="p">}</span>
</code></pre></div></div>

<p>The boolean extension above covers the majority of simple cases, however, we can easily add another extension to enable this to work for a much more complex bit of state management.</p>

<div class="language-swift highlighter-rouge"><div class="highlight"><pre class="highlight"><code><span class="kd">extension</span> <span class="kt">Gatekeeper</span> <span class="k">where</span> <span class="kt">Value</span><span class="p">:</span> <span class="kt">SetAlgebra</span> <span class="p">{</span>
    <span class="kd">public</span> <span class="nf">init</span><span class="p">()</span> <span class="p">{</span>
        <span class="k">self</span><span class="o">.</span><span class="n">value</span> <span class="o">=</span> <span class="p">[]</span>
    <span class="p">}</span>

    <span class="kd">@discardableResult</span>
    <span class="kd">public</span> <span class="k">mutating</span> <span class="kd">func</span> <span class="nf">attemptPassage</span><span class="p">(</span><span class="k">for</span> <span class="nv">option</span><span class="p">:</span> <span class="kt">Value</span><span class="o">.</span><span class="kt">Element</span><span class="p">)</span> <span class="o">-&gt;</span> <span class="kt">Bool</span> <span class="p">{</span>
        <span class="k">defer</span> <span class="p">{</span> <span class="n">value</span><span class="o">.</span><span class="nf">insert</span><span class="p">(</span><span class="n">option</span><span class="p">)</span> <span class="p">}</span>
        <span class="k">return</span> <span class="o">!</span><span class="n">value</span><span class="o">.</span><span class="nf">contains</span><span class="p">(</span><span class="n">option</span><span class="p">)</span>
    <span class="p">}</span>

    <span class="kd">public</span> <span class="kd">func</span> <span class="nf">mayPass</span><span class="p">(</span><span class="k">for</span> <span class="nv">option</span><span class="p">:</span> <span class="kt">Value</span><span class="o">.</span><span class="kt">Element</span><span class="p">)</span> <span class="o">-&gt;</span> <span class="kt">Bool</span> <span class="p">{</span>
        <span class="o">!</span><span class="n">value</span><span class="o">.</span><span class="nf">contains</span><span class="p">(</span><span class="n">option</span><span class="p">)</span>
    <span class="p">}</span>

    <span class="kd">public</span> <span class="k">mutating</span> <span class="kd">func</span> <span class="nf">reset</span><span class="p">(</span><span class="k">for</span> <span class="nv">option</span><span class="p">:</span> <span class="kt">Value</span><span class="o">.</span><span class="kt">Element</span><span class="p">)</span> <span class="p">{</span>
        <span class="k">self</span><span class="o">.</span><span class="n">value</span><span class="o">.</span><span class="nf">remove</span><span class="p">(</span><span class="n">option</span><span class="p">)</span>
    <span class="p">}</span>
<span class="p">}</span>
</code></pre></div></div>

<p>Putting this to use, if we imagine a <code class="language-plaintext highlighter-rouge">State</code> OptionSet we can see where using a Gatekeeper here may really shine:</p>

<div class="language-swift highlighter-rouge"><div class="highlight"><pre class="highlight"><code><span class="kd">struct</span> <span class="kt">State</span><span class="p">:</span> <span class="kt">OptionSet</span> <span class="p">{</span>
    <span class="k">var</span> <span class="nv">rawValue</span><span class="p">:</span> <span class="kt">Int</span>

    <span class="kd">static</span> <span class="k">let</span> <span class="nv">loading</span><span class="p">:</span> <span class="k">Self</span> <span class="o">=</span> <span class="o">.</span><span class="nf">init</span><span class="p">(</span><span class="nv">rawValue</span><span class="p">:</span> <span class="mi">1</span> <span class="o">&lt;&lt;</span> <span class="mi">0</span><span class="p">)</span>
    <span class="kd">static</span> <span class="k">let</span> <span class="nv">loaded</span><span class="p">:</span> <span class="k">Self</span> <span class="o">=</span> <span class="o">.</span><span class="nf">init</span><span class="p">(</span><span class="nv">rawValue</span><span class="p">:</span> <span class="mi">1</span> <span class="o">&lt;&lt;</span> <span class="mi">1</span><span class="p">)</span>
<span class="p">}</span>

<span class="kd">class</span> <span class="kt">MyViewController</span><span class="p">:</span> <span class="kt">UIViewController</span> <span class="p">{</span>
    <span class="kd">private</span> <span class="k">var</span> <span class="nv">stateGatekeeper</span> <span class="o">=</span> <span class="kt">Gatekeeper</span><span class="o">&lt;</span><span class="kt">State</span><span class="o">&gt;</span><span class="p">()</span>

    <span class="kd">func</span> <span class="nf">load</span><span class="p">()</span> <span class="p">{</span>
        <span class="k">guard</span> <span class="n">stateGatekeeper</span><span class="o">.</span><span class="nf">attemptPassage</span><span class="p">(</span><span class="nv">for</span><span class="p">:</span> <span class="o">.</span><span class="n">loading</span><span class="p">),</span> <span class="n">stateGatekeeper</span><span class="o">.</span><span class="nf">mayPass</span><span class="p">(</span><span class="nv">for</span><span class="p">:</span> <span class="o">.</span><span class="n">loaded</span><span class="p">)</span> <span class="k">else</span> <span class="p">{</span> <span class="k">return</span> <span class="p">}</span>

        <span class="n">model</span>
            <span class="o">.</span><span class="nf">fetch</span><span class="p">()</span>
            <span class="o">.</span><span class="nf">handleEvents</span><span class="p">(</span><span class="nv">receiveCompletion</span><span class="p">:</span> <span class="p">{</span> <span class="p">[</span><span class="k">weak</span> <span class="k">self</span><span class="p">]</span> <span class="n">_</span> <span class="k">in</span>
                <span class="k">self</span><span class="p">?</span><span class="o">.</span><span class="n">stateGatekeeper</span><span class="o">.</span><span class="nf">reset</span><span class="p">(</span><span class="nv">for</span><span class="p">:</span> <span class="o">.</span><span class="n">loading</span><span class="p">)</span>
                <span class="k">self</span><span class="p">?</span><span class="o">.</span><span class="n">stateGatekeeper</span><span class="o">.</span><span class="nf">attemptPassage</span><span class="p">(</span><span class="nv">for</span><span class="p">:</span> <span class="o">.</span><span class="n">loaded</span><span class="p">)</span>
            <span class="p">})</span>
        <span class="o">...</span>
    <span class="p">}</span>
<span class="p">}</span>
</code></pre></div></div>

<p>This will prevent further loads if the <code class="language-plaintext highlighter-rouge">stateGatekeeper</code> indicates that it is either currently loading or has already been loaded. Pretty cool!</p>

<p>As a final example, if you had a requirement to track each time an element was viewed on screen, but you wanted to ensure duplicate views were not recorded, you could use this type to ensure you track each element only a single time.</p>

<div class="language-swift highlighter-rouge"><div class="highlight"><pre class="highlight"><code><span class="kd">class</span> <span class="kt">MyViewController</span><span class="p">:</span> <span class="kt">UIViewController</span> <span class="p">{</span>
    <span class="kd">private</span> <span class="k">var</span> <span class="nv">trackingGatekeeper</span> <span class="o">=</span> <span class="kt">Gatekeeper</span><span class="o">&lt;</span><span class="kt">Set</span><span class="o">&lt;</span><span class="kt">String</span><span class="o">&gt;&gt;</span><span class="p">()</span>

    <span class="kd">func</span> <span class="nf">didView</span><span class="p">(</span><span class="nv">elementIds</span><span class="p">:</span> <span class="p">[</span><span class="kt">String</span><span class="p">])</span> <span class="p">{</span>
        <span class="k">for</span> <span class="n">id</span> <span class="k">in</span> <span class="n">elementIds</span> <span class="k">where</span> <span class="n">trackingGatekeeper</span><span class="o">.</span><span class="nf">attemptPassage</span><span class="p">(</span><span class="nv">for</span><span class="p">:</span> <span class="n">id</span><span class="p">)</span> <span class="p">{</span>
            <span class="nf">trackView</span><span class="p">(</span><span class="nv">for</span><span class="p">:</span> <span class="n">id</span><span class="p">)</span>
        <span class="p">}</span>
    <span class="p">}</span>
<span class="p">}</span>
</code></pre></div></div>

<p>Alright, I’ll wrap it up here and leave it to you to see how else you can leverage this simple <code class="language-plaintext highlighter-rouge">Gatekeeper</code> type. If you find this idea useful or have thoughts on improving the approach, please reach out to me on <a href="https://twitter.com/namolnad">Twitter</a>. I hope that this inspires you to clean up your codebase just a little bit.</p>

<p>Happy coding!</p>]]></content><author><name>Dan Loman</name><email>me@danloman.com</email></author><summary type="html"><![CDATA[Simplified control flow. With some sugar on top.]]></summary></entry><entry><title type="html">Ahoy iOS — First-party analytics on iOS</title><link href="https://danloman.com/2020/10/31/ahoy-ios.html" rel="alternate" type="text/html" title="Ahoy iOS — First-party analytics on iOS" /><published>2020-10-31T00:00:00+00:00</published><updated>2020-10-31T00:00:00+00:00</updated><id>https://danloman.com/2020/10/31/ahoy-ios</id><content type="html" xml:base="https://danloman.com/2020/10/31/ahoy-ios.html"><![CDATA[<p>Hi all — happy Halloween! 🎃👻</p>

<p>Today I’d like to introduce <a href="https://github.com/namolnad/ahoy-ios">Ahoy iOS</a>. It’s a lightweight library for Apple platforms which enables you to quickly and easily set up first-party analytics on your client for sending to your Rails backend. At its core, Ahoy iOS is really just a simple wrapper around the <a href="https://github.com/ankane/ahoy">Ahoy</a> API, though it also provides a number of powerful built-in features.</p>

<p>The backend framework this library was built around, <a href="https://github.com/ankane/ahoy">Ahoy</a>, was written by <a href="https://github.com/ankane">Andrew Kane</a> and is a fully-featured analytics tool you can quickly plug into your existing Rails application. It is easy to setup, easy to use, and is first party, so all of your (and your users’) data will remain on your servers and under your control.</p>

<h2 id="installation">Installation</h2>

<p>Ahoy iOS, despite its name, also supports macOS, tvOS, and watchOS. It’s set up for integration via Swift Package Manager and its inclusion in your project is as simple as adding the following to your <code class="language-plaintext highlighter-rouge">Package.swift</code> file (or following <a href="https://developer.apple.com/documentation/xcode/adding_package_dependencies_to_your_app">Apple’s instructions</a> for Xcode).</p>

<div class="language-swift highlighter-rouge"><div class="highlight"><pre class="highlight"><code><span class="k">let</span> <span class="nv">package</span> <span class="o">=</span> <span class="kt">Package</span><span class="p">(</span>
    <span class="nv">name</span><span class="p">:</span> <span class="s">"YourProject"</span><span class="p">,</span>
    <span class="err">…</span> <span class="c1">// package definition cont.</span>
    <span class="nv">dependencies</span><span class="p">:</span> <span class="p">[</span>
        <span class="o">.</span><span class="nf">package</span><span class="p">(</span><span class="nv">url</span><span class="p">:</span> <span class="s">"https://github.com/namolnad/ahoy-ios.git"</span><span class="p">,</span> <span class="nv">from</span><span class="p">:</span> <span class="s">"0.2.0"</span><span class="p">),</span>
    <span class="err">…</span> <span class="c1">// package definition cont.</span>
<span class="p">)</span>
</code></pre></div></div>

<h2 id="usage">Usage</h2>

<p>Ahoy iOS tracks both visits and events. All events are associated with the current visit, and as such, a visit must first be tracked prior to tracking any subsequent events. To track a visit, create a new Ahoy client (maintain a reference) and use the <code class="language-plaintext highlighter-rouge">trackVisit()</code> method.</p>

<div class="language-swift highlighter-rouge"><div class="highlight"><pre class="highlight"><code><span class="n">ahoy</span><span class="o">.</span><span class="nf">trackVisit</span><span class="p">()</span>
    <span class="o">.</span><span class="nf">sink</span><span class="p">(</span><span class="nv">receiveCompletion</span><span class="p">:</span> <span class="p">{</span> <span class="n">_</span> <span class="k">in</span> <span class="p">},</span> <span class="nv">receiveOutput</span><span class="p">:</span> <span class="p">{</span> <span class="n">visit</span> <span class="k">in</span> <span class="nf">print</span><span class="p">(</span><span class="n">visit</span><span class="p">)</span> <span class="p">})</span>
    <span class="o">.</span><span class="nf">store</span><span class="p">(</span><span class="nv">in</span><span class="p">:</span> <span class="o">&amp;</span><span class="n">cancellables</span><span class="p">)</span>
</code></pre></div></div>

<p>After a visit has successfully been tracked, you are free to track events at will. The simplest method of tracking an event is to use the fire-and-forget <code class="language-plaintext highlighter-rouge">track(_:properties:)</code> method.</p>

<div class="language-swift highlighter-rouge"><div class="highlight"><pre class="highlight"><code><span class="n">ahoy</span><span class="o">.</span><span class="nf">track</span><span class="p">(</span><span class="s">"Viewed book"</span><span class="p">,</span> <span class="nv">properties</span><span class="p">:</span> <span class="p">[</span><span class="s">"book_id"</span><span class="p">:</span> <span class="mi">4</span><span class="p">])</span>
</code></pre></div></div>

<p>If you’d prefer to minimize the number of calls to your backend, a bulk <code class="language-plaintext highlighter-rouge">track(events:)</code> method is also available.</p>

<p>And that’s really all there is to it — easy as 🥧, right?!?</p>

<p>Given the ever-growing concerns over data privacy, there has never been a better time to ensure you’re owning your tracking events end-to-end and not sharing this data with third parties. <a href="https://github.com/namolnad/ahoy-ios">Ahoy iOS</a>, <a href="https://github.com/ankane/ahoy">Ahoy</a> and <a href="https://github.com/instacart/ahoy-android">Ahoy Android</a> are great tools to make this as easy as possible.</p>

<p>Thanks for reading! Feel free to share your feedback with <a href="https://twitter.com/namolnad">me</a> and/or contribute to help improve <a href="https://github.com/namolnad/ahoy-ios">Ahoy iOS</a>.</p>]]></content><author><name>Dan Loman</name><email>me@danloman.com</email></author><category term="swift" /><category term="analytics" /><category term="ios" /><summary type="html"><![CDATA[Today I'd like to introduce Ahoy iOS. It's a lightweight library for Apple platforms which enables you to quickly and easily set up first-party analytics on your client for sending to your Rails backend.]]></summary></entry><entry><title type="html">Introducing Finch 🐦 — A conventional-commit powered changelog generator</title><link href="https://danloman.com/2019/08/09/introducing-finch.html" rel="alternate" type="text/html" title="Introducing Finch 🐦 — A conventional-commit powered changelog generator" /><published>2019-08-09T00:00:00+00:00</published><updated>2019-08-09T00:00:00+00:00</updated><id>https://danloman.com/2019/08/09/introducing-finch</id><content type="html" xml:base="https://danloman.com/2019/08/09/introducing-finch.html"><![CDATA[<p>Hello, World! Meet <a href="https://github.com/namolnad/safeguard">Finch</a>, a configurable commandline tool, built in Swift, designed to easily create and format changelogs. Finch, meet the World. 🤝</p>

<hr />

<p>A good changelog can save a lot of potential headaches down the road. Whether it be to report to stakeholders when a change was introduced, to let customers know what new features are coming out, or to aid developers who are tracking down a new bug, it can be invaluable to keep track of when every feature, bug fix, or otherwise substantial change came about.</p>

<p>Unfortunately, developers already have more than enough on their plates - which often leaves changelogs untimely, completely forgotten, or in the best case, difficult to maintain stylistically between various team members. These problems are what inspired the creation of <a href="https://github.com/namolnad/safeguard">Finch</a>.</p>

<p><img src="/assets/finch-git-log.png" alt="Finch git log" />
<em>
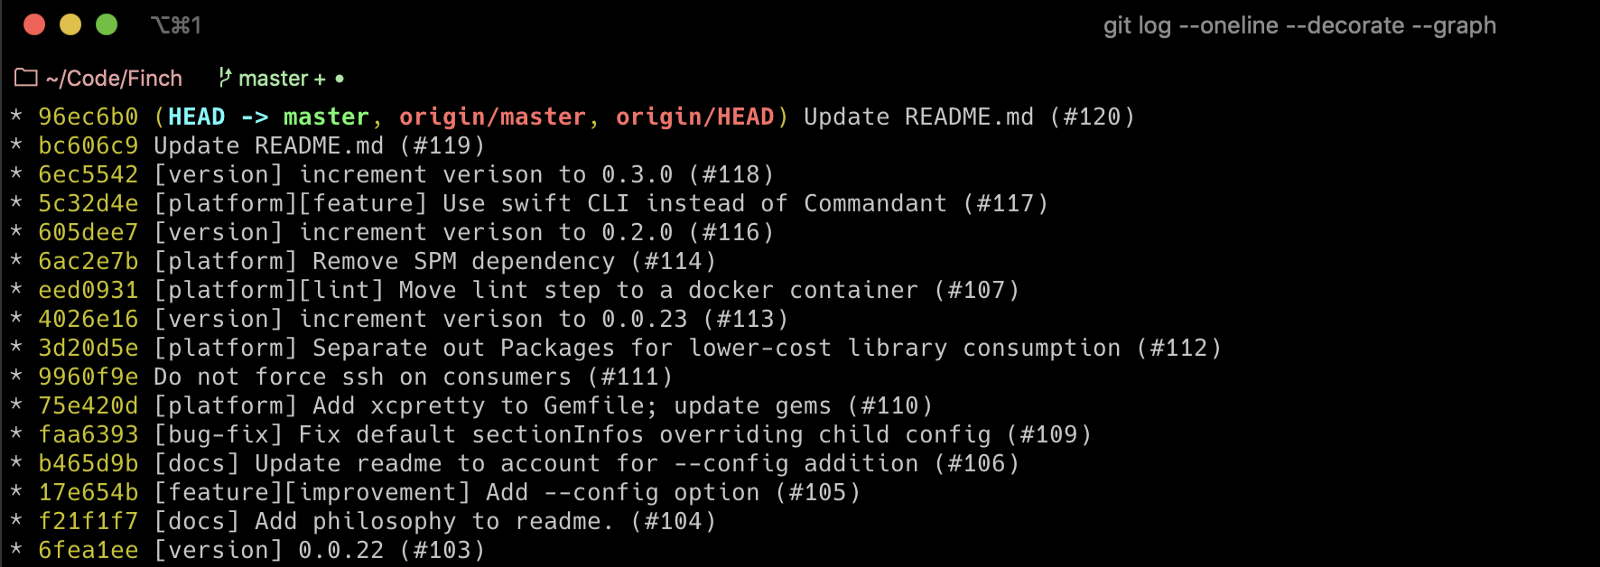
Viewing Finch’s raw git log which powers the generated changelog</em></p>

<p>Through the use of well-formed and intentional Git commit messages, Finch can very easily convert your Git commits into a consistently formatted, and fully automated changelog. The commit messages serve as the underlying data which is then passed through a formatting system according your project’s custom configuration. The only requirement Finch has is the use of some relatively minor commit-message discipline - the simple use of “tag” prefixed commit messages. For example:</p>

<blockquote>
  <p>git commit -m ‘[feature] Add the bells. And the whistles’</p>
</blockquote>

<p>With just that — and according to whatever conventions your team would like to use - Finch can help you automate your internal and external-facing changelogs, providing as much detail or polish as is desired. All you have to do is run <code class="language-plaintext highlighter-rouge">finch compare</code> and Finch will take care of the rest.</p>

<p><img src="/assets/finch-example-command.png" alt="Finch example command" />
<em>
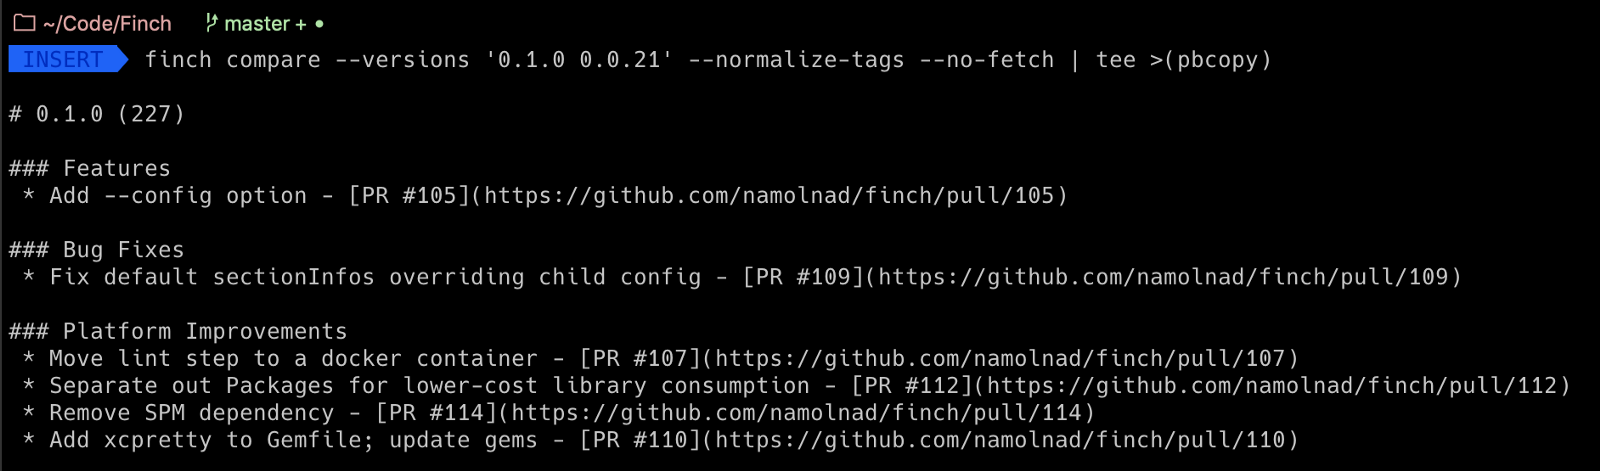
Using Finch to generate a changelog between two recent versions of Finch. Super meta.</em></p>

<p>It’s that simple! And the above raw markdown renders beatifully as your formatted changelog:</p>

<p><img src="/assets/finch-example-output.png" alt="Finch exmaple output" />
<em>
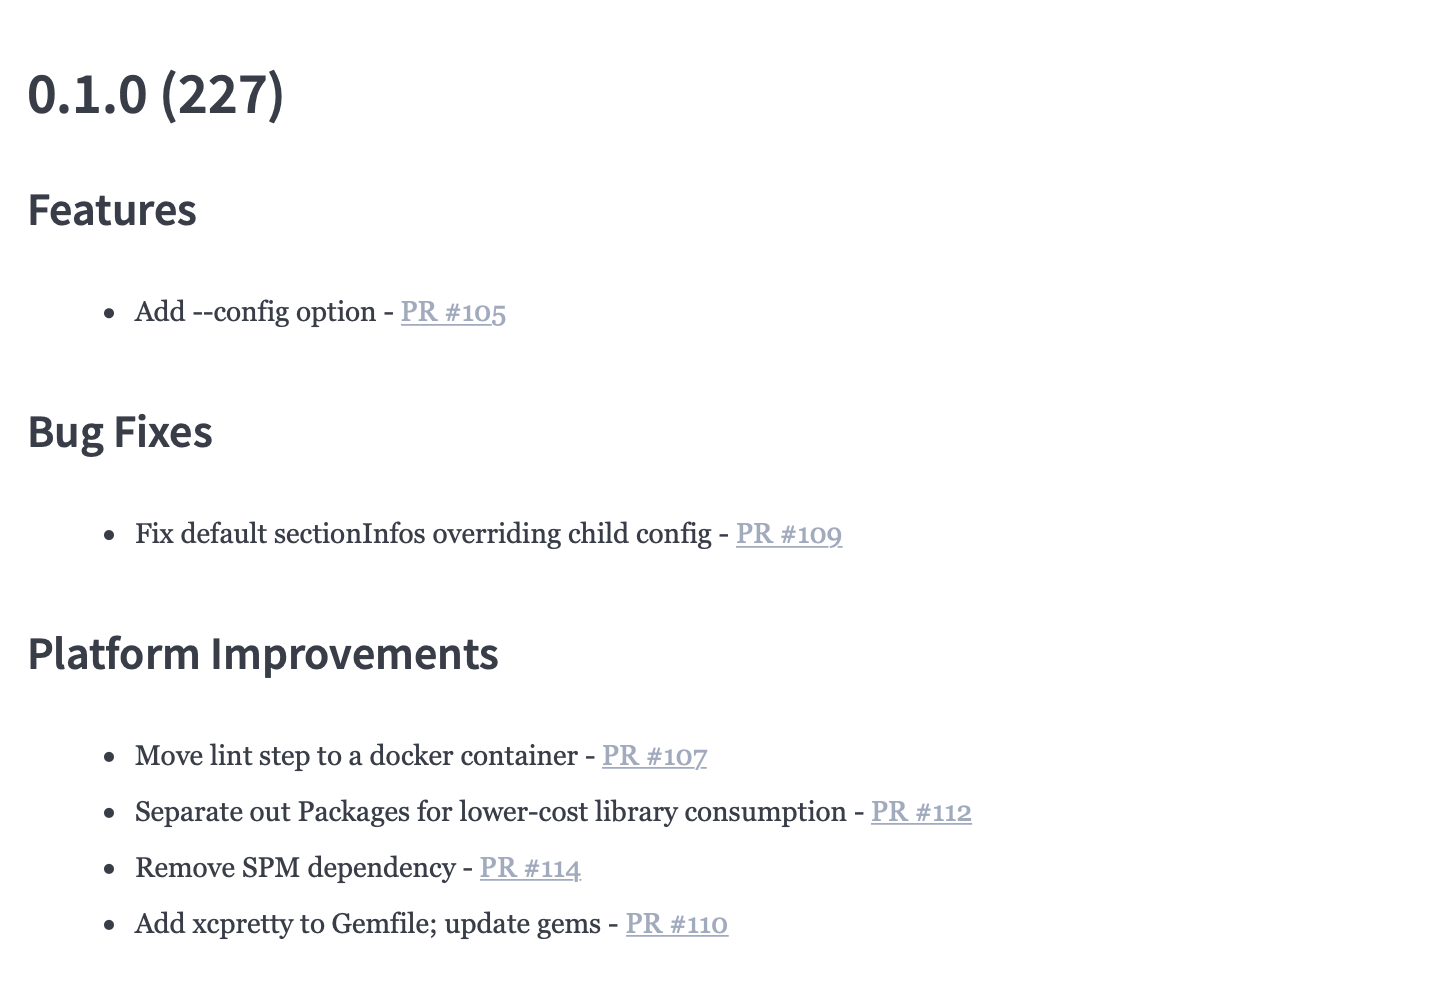
The Finch changelog as fully rendered markdown - so simple!</em></p>

<p>Check it out <a href="https://github.com/namolnad/safeguard">here</a> and let me know what you think!</p>]]></content><author><name>Dan Loman</name><email>me@danloman.com</email></author><category term="swift" /><category term="tooling" /><category term="changelog" /><summary type="html"><![CDATA[Hello, World! Meet Finch, a configurable commandline tool, built in Swift, designed to easily create and format changelogs. Finch, meet the World. 🤝]]></summary></entry><entry><title type="html">Safeguard: Avoiding 🙉 Silent Failures with Swift</title><link href="https://danloman.com/2017/02/07/safeguard-avoiding-silent-failures-with-swift.html" rel="alternate" type="text/html" title="Safeguard: Avoiding 🙉 Silent Failures with Swift" /><published>2017-02-07T00:00:00+00:00</published><updated>2017-02-07T00:00:00+00:00</updated><id>https://danloman.com/2017/02/07/safeguard-avoiding-silent-failures-with-swift</id><content type="html" xml:base="https://danloman.com/2017/02/07/safeguard-avoiding-silent-failures-with-swift.html"><![CDATA[<p>Instacart ❤️’s Swift.</p>

<p>For the past year and a half or so, we have been actively moving our customer-facing* iOS codebase from Objective-C to Swift and have all been thoroughly enjoying the transition. There are a lot of advantages gained with the move to Swift and the Swift-ier our code gets, the happier you’ll tend to see us (well, except for Min, he’s our Prince of Darkness… 😈😉)</p>

<p>As with anything, there are a couple of quirks to the language and the evolving conventions that come along with it. Swift, more than almost anything else, is focused on safety. In most cases, as a Swift developer, you want to do whatever it takes to avoid a 💥CRASH💥. The <code class="language-plaintext highlighter-rouge">guard</code> statement is a great tool for this. If you want to make sure a condition exists prior to executing some code, consider utilizing a <code class="language-plaintext highlighter-rouge">guard</code> statement, and you’ll likely be safe to assume things are as you’d expect them to be. Crash successfully avoided. Yay!</p>

<p>Using a <code class="language-plaintext highlighter-rouge">guard let</code> even allows you to unwrap Swift’s Optionals and access their unwrapped values below the <code class="language-plaintext highlighter-rouge">guard</code>. Awesome. Seriously. We love it.</p>

<p>With <code class="language-plaintext highlighter-rouge">guard let</code>, however, you find yourself creating a fair amount of these:</p>

<figure class="highlight"><pre><code class="language-swift" data-lang="swift"><span class="k">guard</span> <span class="k">let</span> <span class="nv">blah</span> <span class="o">=</span> <span class="n">blah</span> <span class="k">else</span> <span class="p">{</span>
    <span class="k">return</span>
<span class="p">}</span></code></pre></figure>

<p>This <code class="language-plaintext highlighter-rouge">else</code> block is a great place to handle the unexpected case, but, when <code class="language-plaintext highlighter-rouge">guard</code> is used extensively throughout your app, that’s a lot of special cases when you were probably just assuming that you were unwrapping an Optional that should have <em>some</em> value. It seems likely you don’t expect that <code class="language-plaintext highlighter-rouge">else</code> block to run fairly often. So, as is seeming to be the general Swift convention these days, you probably leave it to <code class="language-plaintext highlighter-rouge">else { return }</code>, except for a few rare cases.</p>

<p>That. That right there. That’s where we see an issue. Unless you are consistently very good about logging or handling the else block appropriately, you basically have no idea how often it’s failing in the wild. 🙀 Ohhh jeez. No one likes being left in the dark like that.</p>

<p>To handle this situation, and give ourselves a general idea of how to track down where issues may be occurring more often than we’d think, we wrote a lightweight framework which we have called <strong>Safeguard.</strong></p>

<p>The meat and potatoes of what <strong>Safeguard</strong> consists of, is really just a simple extension on Optional with built in logging capabilities that can easily plug into your existing logging system. By implementing the framework’s <code class="language-plaintext highlighter-rouge">safeguard()</code> function in mission-critical areas, we are able to pass important information to our logger to help us track down what the issue may be. <code class="language-plaintext highlighter-rouge">safeguard()</code> passes the <code class="language-plaintext highlighter-rouge">#function</code> where it was called, the <code class="language-plaintext highlighter-rouge">#file</code>, the <code class="language-plaintext highlighter-rouge">#line</code> and the <code class="language-plaintext highlighter-rouge">Type</code>. In addition to these clues, with <strong>Safeguard</strong>’s extra <code class="language-plaintext highlighter-rouge">customLoggingParams</code>, we can pass up relevant session info which may help us reproduce and diagnose the problem later on.</p>

<p><strong>Safeguard</strong> also provides us with a customizable callback: <code class="language-plaintext highlighter-rouge">nilHandler</code>, which makes it easy to manage custom use cases when an Optional has failed to unwrap. This <code class="language-plaintext highlighter-rouge">nilHandler</code> also conveniently passes a <code class="language-plaintext highlighter-rouge">Bool</code> flag to indicate whether or not the app is running in DEBUG mode. Agh! So many helpful things!!!</p>

<p>To implement <code class="language-plaintext highlighter-rouge">safeguard()</code>, and give ourselves this nice bit of reassurance, we can add <strong><em>all</em></strong> of the above functionality to any Optional simply by adding:</p>

<figure class="highlight"><pre><code class="language-swift" data-lang="swift"><span class="k">guard</span> <span class="k">let</span> <span class="nv">blah</span> <span class="o">=</span> <span class="n">blah</span><span class="o">.</span><span class="nf">safeguard</span><span class="p">()</span> <span class="k">else</span> <span class="p">{</span>
    <span class="k">return</span>
<span class="p">}</span></code></pre></figure>

<p>Pretty easy. One word added. World saved. Woot woot! 🎉</p>

<p>In the spirit of saving the world and sharing all the goodness, we have <a href="https://github.com/namolnad/safeguard">open-sourced</a> <strong>Safeguard</strong>, and have made it easy to install through either Carthage or <a href="https://github.com/namolnad/safeguard">Cocoapods</a>. We’ve also included some basic installation, usage and configuration instructions in the <a href="https://github.com/namolnad/safeguard">README</a> file. (Of course, if you have any suggestions for improvements or additions, please feel free to add an issue or submit a pull request!)</p>

<p>We hope you enjoy turning all those stupid 🙉 silent failures into 📣 loud failures!</p>

<p>Till next time,</p>

<p>-Dan &amp; the Customer iOS team</p>

<div class="language-plaintext highlighter-rouge"><div class="highlight"><pre class="highlight"><code>If you love Swift and are interested in finding solutions like the above, we
are currently hiring mobile engineers and would love to speak with you.

*Note: Our Shopper App team has been working on the same Obj-C -&gt; Swift
transition, credit where it’s due and all that, but I’m on the
customer-facing team and am the one writing this, sooooo, I’ll be writing
from our perspective 😉
</code></pre></div></div>]]></content><author><name>Dan Loman</name><email>me@danloman.com</email></author><category term="swift" /><category term="ios" /><category term="logging" /><summary type="html"><![CDATA[Instacart ❤️’s Swift.]]></summary></entry></feed>